

Welcome to the second lesson. :) Last time, we prepared the hardware and canvas - so now we can finally move onto something more creative.
I want to create a whole series of tutorials - I'd be also glad to answer your questions. Remember that everything I post here are just example techniques that I personally use, but there's no such thing as good or bad technique of creation. :) That's why I encourage you to take my lessons with a grain of salt and experiment on your own - that's how I came up with my own style. :)
So I'll start with a technique I use for the most part of my paintings: face, arms, often clothes too. Here I'll use the face as an example. :) This technique is based on laying shadows and highlights alternately - until you reach your goal.
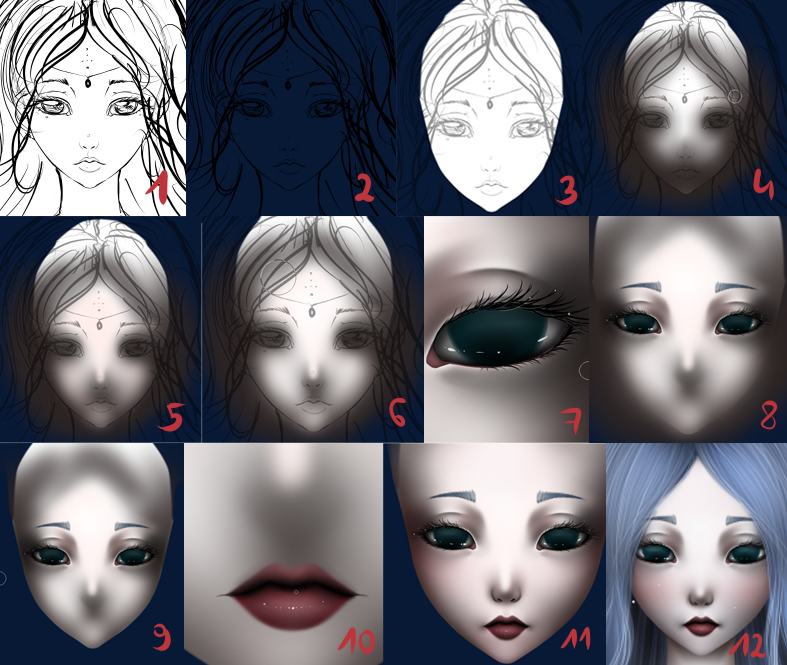
1. I create a sketch. I hid the background layer for a while, because it was dark.
2. I turn the background layer back on. Now we'll lower the opacity of the sketch layer.
3. I've drawn a base for the face.
4. Now I've drawn a layer of shadows.
5. And now a layer with the skin tone.
6. Now it's time for the highlights.
7. Now we should draw an eye. I'll make another tutorial for eyes! :)
8. I hid the layer with the sketch. Now the eyes are here so we can put some shadows and highlights, so they'll fit in the face! :)
9. I merge layers with highlights and shadows here. I erase everything that's outside of the base's area.
10. I draw the mouth. I'll make a tutorial for mouths too. :)
11. Right now we've got the mouth, so similarily as with the eyes, now it's time for the shadows and highlights. I'm also adding layers of color for the cheeks; I generally finish the rest of the face.
12. Even though I've finished the face in 11, after adding the hair and neck I had to add a bit more highlight. :) Actually, each part of the picture may require little adjustments after adding something.
I make most actions on separate layers, so I can easily go back if I didn't like the effect.
Now a bit of theory. :)
First, some details on managing the layers.

To hide a layer, click the eye (I marked it with a blue circle).
To add a new layer, click the option marked with a green circle.
The active layer is marked with a pen icon (purple circle).
To merge layers, click the scissors marked with a red circle.
I marked the layer deletion button with a pink circle.
Yellow circle - layer opacity.
Brushes.
The Pen tool is my favorite for drawing sketches. I use these settings: Min Size: 0%, Density: 100 (notice how does the line look after you play with these sliders ;)). I change the Size while I work; I use smaller brush for the eyes than for the hair. Brush hardness is highlighted with a green circle. I use the hardest one for sketches - the leftmost one is the softest.

I use the AirBrush tool for shadows and highlights. It's good to change the size and hardness of the brush while drawing the shadows: the picture will be more detailed this way. For example, the shadow that's casted by an element that's closer is sharper than by one that's far away. Basically, it'd be possible to write a whole book about shadows, but I personally think that it's better to observe on your own rather than read about such stuff. :)


If we put the shadows and highlights and see that the picture needs a little softening, we can use the Blur tool. Blur mixes the colors - just try :)

We can get rid of everything that's unnecessary with the eraser tool! :)

And that's all for now, at least about the theory :) I hope that you'll find it useful. :)
A few more tips:
1. Save your work often! The pain you feel when your software crashes after a few hours of unsaved work and you can do nothing about it is indescribable! xD I actually have my left hand resting on the ctrl key all the time and I press ctrl + s often. Also useful for undo (ctrl + z). :)
2. Even if you save your work often, it's safe to make a backup copy occasionally. It's possible that the software will fail to save the file at some point and you won't be able to recover it otherwise.
And that's all. :)
Did you enjoy it? Like my fanpage here: https://www.facebook.com/NImFpaArt
No comments:
Post a Comment